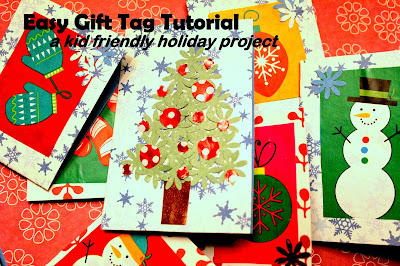
Want to know a secret? I still have scraps of wrapping paper from 5 years ago. In fact, every Christmas my sisters and I would collect leftover wrapping paper. At one point, It became the thing to do at our house after all the gifts were wrapped and later opened. I needed to do something with them but didn't have the heart to recycle some of the cuter paper.
The solution? Make gift tags! It definitely became a beautiful way to add a personal touch to holiday presents. Let the kids help out!
For this crafty project, I will tell you 2 easy and creative ways to make gift tags using leftover wrapping paper and scrapbook paper.
 |
| Give the kids a holiday project to do! |
This can be a holiday project is great for kids to do side-by-side with you while you wrap presents. Let the kiddos be "art directors" by telling you where shapes should go and help them glue them on.
My 3-year-old can nephew loves helping out. He loves using a glue stick to add paper cutouts to card stock. He revels in his own masterpieces! So yes, toddlers (with adult help) can have fun with this.
Go gather up your wrapping paper and before you recycle...reuse!
Holiday Tutorial: 2 Types of DIY Holiday Gift Tags
Time Commitment: This depends on how many you are making. For my craft session, I took about 1 hour to make 20 tags. But you can probably do it the same evening you are wrapping gifts with a holiday movie in the background.
A Special Note on Kids: This craft project is a fun activity for kids who don't know how to wrap, but who want to help out with gifts and presents. Give them a specific "job" to do by making the gift tags. Prepare any cutouts and paper punches ahead of time. Then have the kids do the assembly and gluing. I think kids as young as 3 can definitely be Santa's little helpers.
What You Will Need:
 |
| Materials needed for DIY Gift Tags |
- Leftover wrapping paper
- Scrapbook paper, card stock, or construction paper (any "stiff" paper to glue on)
- Scissors
- Glue stick
- Paper punch or hole punch (optional)
- Any embellishments (optional, but adds dimension!)
- stickers
- paper shapes from paper punches
- glitter
- cotton balls
- ribbon
Gift Tag Example # 1: Using holiday shapes from wrapping paper
Step 1: Gather your wrapping paper. Cut out any holiday shapes and symbols you find. Let kids pick their favorite symbols or let them create holiday shapes from scraps.
 |
| Santa Claus gift wrapping paper |
Some examples of holiday shapes that you might find on gift wrapping paper include:
- candy canes
- mittens and hats
- wrapped presents
- nativity scene
- stars
- candles
- snowflakes
- gingerbread houses and cookies
- reindeer
- bows
- Santa Claus
- a snowman
- ornaments
- sleds
- phrases such as "happy holidays"
- poinsettias and berries
- wreaths
- angels
Need a shape? If you don't have paper with these symbols, simply download this Christmas printable, trace it on some wrapping paper and cut out the shape. Once you've finished cutting out your holiday shapes, you'll be ready for gluing in Step 2.
Once you're done cutting your holiday symbols, glue them onto a decorative piece of holiday scrapbook paper, cardstock or construction paper. Any of these thicker papers can serve as a good background for your gift tag. Then cut the background paper into a desired shape: a circle, a rectangle, a foldable card, etc.
Step 2: Glue shapes on scrapbook paper, cardstock or construction paper. Cut out your gift tag.
Once you're done cutting your holiday symbols, glue them onto a decorative piece of holiday scrapbook paper, cardstock or construction paper. Any of these thicker papers can serve as a good background for your gift tag. Then cut the background paper into a desired shape: a circle, a rectangle, a foldable card, etc.
Step 3: Add embellishments!
My favorite craft rule is layer, layer, layer.
My favorite craft rule is layer, layer, layer.
This is the fun part. Add glitter, paper cutouts, or other types of textures to the card. Glue them on the corners or layer them to create depth. Embellishments really add that certain "je ne sais quoi" to a gift tag. And it becomes an extra special touch for the person receiving your present.
 |
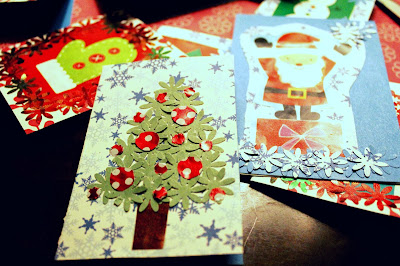
| Example 1: I used a paper punch to make flowers and glued it onto the gift tag. Here, the blue and white flowers look like snowflakes against the blue background. |
Step 1: Make your own holiday shapes from a paper punch by punching out leaves, flowers, snowflakes, etc. Here's another cute way to make a gift tag. Instead of using holiday shapes from wrapping paper, try using cutouts from paper punches to design your gift tag. You can use your favorite paper punch to create holiday symbols such snowflakes, poinsettias, wreaths or Christmas trees.
You don't need to have a holiday-themed paper punch to make a beautiful design. You can still use a leaf or flower paper punch to create holiday symbols. You can even use a regular hole puncher. The key is to creatively assemble your cutouts on your gift tag.
For one of my gift tags, I used a flower paper punch to make a bunch of green flowers. I layered the paper flowers on my chosen background paper and in doing so, I created a pine tree.
 |
| Get creative with your paper punch tools! |
Step 2: Glue shapes on scrapbook paper, cardstock or construction paper. Cut out your gift tag.
Once you've finished using the paper punch to make your desired cutouts, glue them onto a decorative piece of holiday scrapbook paper, cardstock or construction paper. Any of these thicker papers can serve as a good background for your gift tag. Then cut the background paper into a desired shape: a circle, a rectangle, a foldable card, etc.
Once you've finished using the paper punch to make your desired cutouts, glue them onto a decorative piece of holiday scrapbook paper, cardstock or construction paper. Any of these thicker papers can serve as a good background for your gift tag. Then cut the background paper into a desired shape: a circle, a rectangle, a foldable card, etc.
Step 3: Add embellishments!
As in the first example, follow my rule: layer, layer, layer. It adds some depth to your design and to your finished product.
As in the first example, follow my rule: layer, layer, layer. It adds some depth to your design and to your finished product.
 |
| Completed holiday gift tags. |
All done!
As I was finishing up this project I had two new ideas pop into my head. I wanted to jot them down before I forgot:
- Maybe I will try making gift tags from some unused holiday cards. Some cards already have embossed designs on them. This is a clever way to add texture to your gift tag, especially if you don't have an embossing machine.
- I think I'll make a "holiday gift tag" box to store paper and potential craft ideas. After opening your Christmas gifts, cut out shapes ahead of time and recycle the rest of the wrapping paper so you don't end up storing a trash bag of paper all year long. Make gift tags whenever you want! Also, when an idea pops up in your head, add that idea to the holiday gift tag box! There are so many other creative ways to use old gift wrapping paper. Or gift your "holiday gift tag" box to someone who loves to craft. For example, you can give it to an older child and watch their creative mind spring into action!
- A future playdate idea? Sometimes I enjoy play dates at a park. Other times, I enjoy a good "craft day" playdate. It can bring out the fun for everyone: both parents and kids can express themselves through their art and maybe learn some design skills in the process! Maybe I'll bookmark this craft project so I can do it with others next year.
 |
| Next year's gift tags: don't let a bag full of cute wrapping paper go to waste! |
Do you need a holiday project for this year or next? Try making these holiday gift tags!
If you did this tutorial let me know! If it's alright with you, I'd love to post the inspiring and creative work of some of my readers. :)


No comments:
Post a Comment